Cream cheese

Cream cheese: one of the many foods that I, a picky eater, missed out on until adulthood. Now, bagels and cream cheese, cheesecake, stuffed french toast…ahh the delight!

This weekend we attempted cream cheese. It took 24 hours, but it was very much a hands-off experience. Mixing in a mesophilic starter, waiting, pouring into butter muslin, draining, then salting and tasting. It was very easy, but I’m not sure it turned out correctly.

We may have gone wrong with our raw ingredients. Ultra-pasteurized milk won’t make cheese properly. We used it once to make mozzarella, and the cheese tasted fine, but never set into a proper cheese. (It made a yummy cheese dip though.) This recipe called for light cream or half-and-half, but after searching all over town, none could be found that wasn’t ultra-pasteurized. So, we used half heavy cream and half whole milk. Ingenious? Or folly? We can’t really say.

The other place we may have gone wrong was the overnight setting. The milk/starter combination was supposed to set at 72 degrees. We certainly weren’t going to babysit it all night, so we first tried this pot warmer:

However, it isn’t adjustable, and so it kept the pot a bit too warm. When I checked it the next morning, the cheese when somewhere in the 80 – 90 degree range. So, next time, no pot warmer. Maybe we’ll just pop it into the oven overnight so it can retain its own heat.


This is what it looked like – that’s the thermometer probe. It had done quite a bit of thickening overnight.


Next, it was poured into a colander lined with butter muslin and hung to dry for 12 hours. We changed the muslin once, and could see the change as the cream cheese gave up some of its moisture.


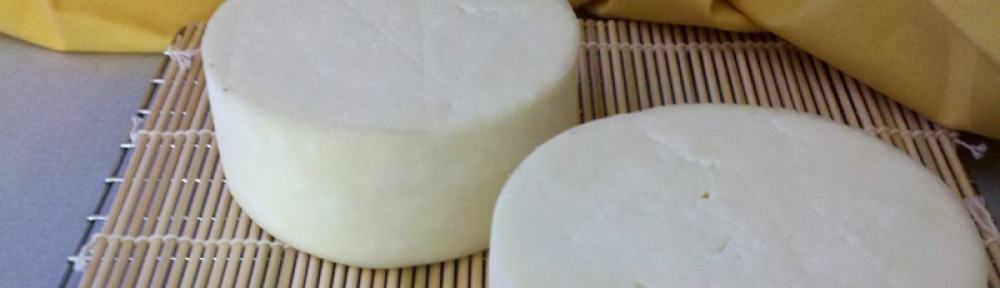
Here’s what we were left with:

Pretty. Creamy. And the flavor? Well, a bit like sour cream. Hm. We even looked up the recipe for sour cream, just in case our substitution, or the overnight temperature, had given us sour cream instead of cream cheese. But no, that doesn’t seem to be the case.


After salting, it tasted a bit more like cream cheese. We flavored some with basil and left the rest plain, with plans of cream cheese brownies next weekend!

Are there any cheese-makers out there who know what went wrong? Or is this how fresh cream cheese is supposed to taste?

Mozzarella

Thank goodness for two extra pairs of hands, because we made four pounds of mozzarella this weekend! Ricki Carroll’s 30-minute mozzarella recipe is super-easy and makes a yummy cheese.

The raw ingredient: half a gallon of whole milk and half a gallon of 2%.

The milk must be heated to 55 degrees, then citric acid is added. The milk is then heated to 90 degrees, and the rennet is added. (Adam also likes to add calcium chloride, to help the cheese form nicer curds. He had been doing this at 89 degrees, or right before adding the rennet, but things got a little crazy in the kitchen, and one of our helpers added it at 80 degrees. The cheese stretched very nicely for that batch, so this may be our new procedure!)

Adding the rennet causes the exciting part to happen.

The milk begins to curdle. I suppose this may not look appetizing, unless you know what the end result is going to be.

More stirring and heating, then it’s time to pour everything into a cheesecloth, drain the whey (we didn’t save it this time, but you can make English Muffin Bread, ricotta cheese, and probably other things we haven’t yet discovered) and begin playing with the mozzarella.

Using the microwave, the mozzarella is heated for a few seconds, then kneaded, heated, kneaded, heated, kneaded…you get the idea. This gives the mozzarella that wonderful stretchiness and stringiness. Before microwaves, the cheese was dipped into the hot whey to heat it up to a workable temperature. What’s a workable temperature? Hot enough that you can only hold the cheese for about 5 seconds without juggling it, and the palms of your hands turn red and radiate heat – a nice feeling for someone with perpetually cold hands!

Adam’s flashier twist-n-stretch.


Once it’s attained a nice stretchiness, it’s time to shape the cheese. Adam hasn’t created a ball of mozzarella yet that he’s happy with. It’s difficult to get a nice, smooth skin on the cheese, and a perfect sphere seems impossible. I say it’s the taste that counts, but we can keep practicing!

Before you begin shaping the ball is the perfect time to taste the cheese. It doesn’t get any fresher, and it’s a wonderful temperature yet from the microwaving and stretching. We were getting hungry, so one ball of mozzarella is a bit smaller than the rest. But I digress…

Into an ice bath for 30 minutes to cool off and lock it into its shape.


Remove, pat off the excess moisture, allow to air dry a bit, and you’re done! 30 minutes for a great mozzarella!

Waiting for the cheddar

Image

This nice little hockey puck is a wheel of waxed Farmhouse Cheddar that Adam and I made a few weeks ago. The fun wasn’t over when it came out of the press! Adam took this to work for the first week, flipping it over twice a day, monitoring the moisture content, and watching to see when enough of a rind had formed. (This step reminds me of a high school classmate who found a litter of motherless kittens and brought them to school in a shoebox each day so she could bottle-feed them. I’m sure wheels of cheese on your desk is almost as good a conversation starter!) After a few days of this, it was time to wax, then it was my turn to babysit. After two flips a day for another week and checking to make sure there was no suspicious bulging of the wheels, we’ve now moved on to the stage of a few flips a week and the long wait. Farmhouse Cheddar is ready to eat in one month, but we’ve made a few batches of this before, and while it’s good after a month, it only gets better the longer you let it age. I think previous batches made it to the 6-month mark, and tasted great.

However, as evidence that this cheddar doesn’t taste bad right out of the press, I offer this:

Image

These are the 3.5 cheese wheels in our “cheese refrigerator.” The half-wheel is the result of the daily nibbles that seem to be a requirement in that first week of flipping and monitoring. The fresh cheddar carries a hint of what it will become, and it’s hard to resist, which is why we’ve decided to make mozzarella whenever we make cheddar. It’s quick and easy, relatively, and gives us some immediate gratification while we begin the long wait.

English Muffin bread

Adam made four gallons of milk into mozzarella Friday night, and saved eight cups of whey so we could try this bread. We’ve had store-bought English Muffin bread before, and it is yummy, so Adam had an easy time talking me into making this recipe he found in Ricki Carroll’s Home Cheese Making book (our go-to source for learning cheese-making). The bread was easy to mix up, a pain to get into the loaf pans, rose in about an hour (one rise only), and tasted divine both hot out of the oven and toasted the next morning.
The recipe calls for proofing the yeast, which produces a wonderful smell.


In the meantime, the whey must be warmed up a bit:

The usual bread-making ensues, but instead of a dough, you’re left with a dry batter, something between muffin batter and bread dough. The trusty Kitchen-Aid made this a breeze, and then came the fun part – getting this “dry batter” into the loaf pans. Copious amounts of nonstick spray made this easier.

It took about an hour for the dough to rise, practically nothing compared to the day-long process of multiple risings that is my standard bread. However, there was a problem. This batter-dough was so wet and weak that it not only stuck to the loosely-placed plastic wrap (I think Adam sprayed it with nonstick spray), but the dough collapsed a bit when we removed the plastic. It also, instead of supporting itself as it rose, flopped over the sides of the pans, and even tried to merge with the other loaves, giving us something like this:


Those bubbles you see on the top are all throughout the bread, so after baking, we had this!


Well, first we had this:

But like my wise father says, the defective (usually we’re talking about chocolate chip cookies) ones must be eaten, and Adam and I can never wait for the bread to cool, like good bread-makers do, before cutting into it, so part of the squashed appearance is due to the dough collapsing a bit, and part is because we cut it too soon.
So, here it is again:

Oh yeah, you know you wanted to see it again!

And the flavor? Way better than the store-bought English Muffin bread. A million times better than regular English Muffins (not that they don’t have their time and place). Chewy, sweet, filled with those nooks & crannies, and just incredible.

Now, this recipe only called for four cups of whey, and remember Adam saved eight cups. Hmm…whatever shall we do with the rest of the whey?

Sunday brought the second batch. This time I added vital wheat gluten, my best friend with my standard bread, since it helps the dough to support itself so it can rise higher without collapsing. It made absolutely no difference with the English Muffin bread. I did, however, have cornmeal this time. The recipe calls for it to be sprinkled in the pan and on top of the dough. It definitely helped the plastic wrap not to stick to the dough, but other than that, just made a mess, since most of it fell off after baking. Here’s the result of the second batch:
And that’s my darling husband’s finger – he’s always gotta be pokin’ the bread!

So, it looks like English Muffin bread is definitely going to become a favorite!